Aqua Text Effect (bumpmap tutorial)
This tutorial shows how you can make a quite good-looking text effect rather easily using
a single add-on and some selection tricks.
Step 1
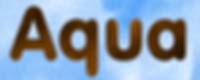
 Pick a suitable background image. In the example we have simply used
the Generate > Tile add-on to fill a blank new canvas with a cloud pattern,
although you could just as well have loaded an existing image.
Pick a suitable background image. In the example we have simply used
the Generate > Tile add-on to fill a blank new canvas with a cloud pattern,
although you could just as well have loaded an existing image.
Step 2
 Switch to selection mode and use the text tool to make type your text.
For this particular effect, a "round" font gives the best-looking results (we've used
VAG Rounded in the example). Note that the bumpmap add-on (which we'll use later on to
create the effect) is by
no means limited to text selections, but its effect is easiest to demonstrate using text.
Switch to selection mode and use the text tool to make type your text.
For this particular effect, a "round" font gives the best-looking results (we've used
VAG Rounded in the example). Note that the bumpmap add-on (which we'll use later on to
create the effect) is by
no means limited to text selections, but its effect is easiest to demonstrate using text.
Step 3
 The bumpmap add-on uses the selection map as a "height map" and then "lights" the image under
an adjustable angle and elevation. The selection as it stands after Step 2 changes quite "abruptly"
(apart from anti-aliasing effects) so using it as a bumpmap directly would result in very
"sharp" transitions. To change this, we use the Gaussian Blur add-on to make the selection map more
"fuzzy". So after this step, the selection (to be used as a bump map) can be thought of as having
the "steep steps" smoothed out into gradual slopes.
The bumpmap add-on uses the selection map as a "height map" and then "lights" the image under
an adjustable angle and elevation. The selection as it stands after Step 2 changes quite "abruptly"
(apart from anti-aliasing effects) so using it as a bumpmap directly would result in very
"sharp" transitions. To change this, we use the Gaussian Blur add-on to make the selection map more
"fuzzy". So after this step, the selection (to be used as a bump map) can be thought of as having
the "steep steps" smoothed out into gradual slopes.
Step 4
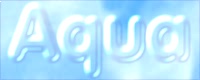 Switching back to Drawing mode and fiddling with the various parameters of the
bumpmap add-on yields the end result. The "Angle" and "Elevation" sliders in the add-on
are for positioning the position of the virtual light source; the "Specular" slider can be
thought of as controlling the type of "material" the canvas is made of - a matte material
(such as paper) has almost no specular reflection properties, whereas a "shiny" material (such as
glass or plastic) has a high specular reflection. The particular "translucent" effect is
achieved by setting the "Translucent" slider to a nonzero value, and setting the light
color to light cyan.
Switching back to Drawing mode and fiddling with the various parameters of the
bumpmap add-on yields the end result. The "Angle" and "Elevation" sliders in the add-on
are for positioning the position of the virtual light source; the "Specular" slider can be
thought of as controlling the type of "material" the canvas is made of - a matte material
(such as paper) has almost no specular reflection properties, whereas a "shiny" material (such as
glass or plastic) has a high specular reflection. The particular "translucent" effect is
achieved by setting the "Translucent" slider to a nonzero value, and setting the light
color to light cyan.