

For the BeOS®
|
|
For the BeOS® |
Launching
Becasso can be launched by either double-clicking on its
icon, dropping one or more files of a supported type on its icon, or
double-clicking the icon of a supported file type. You can use the
FileTypes application to select Becasso as the preferred handler
for any image type for which you have installed a Translator.
When launched via one of the latter two methods, Becasso will
open the file(s) at startup.
Registering
Becasso does not have a separte demo/trial version. Instead,
Becasso needs to be unlocked with a Keyfile. Without this Keyfile, Becasso
is fully functional except for imposing a watermark when exporting.
If you have an ESD version of Becasso (i.e. you downloaded it somewhere),
you can obtain this Keyfile here for
$29 USD. Sum Software will then send you the Keyfile via email, and once you
place it in your ~/config/settings/Becasso directory, Becasso
will be fully functional. Any Becasso files you created during the trial
period can be opened and re-saved to get rid of the watermark.
If you have a CD-ROM version, Becasso will generate the Keyfile for you.
The Main Window
 One of the main characteristics of Becasso is a clear and simple
user interface that doesn't get in your way and only shows what you want
it to. The main window shows a File menu, five square buttons, and
a short description of the button the mouse is currently over. From left
to right, these buttons are the Mode Selector, the Tool Selector, two
Color Selectors for the foreground and background colors, respectively,
and a Pattern Selector.
One of the main characteristics of Becasso is a clear and simple
user interface that doesn't get in your way and only shows what you want
it to. The main window shows a File menu, five square buttons, and
a short description of the button the mouse is currently over. From left
to right, these buttons are the Mode Selector, the Tool Selector, two
Color Selectors for the foreground and background colors, respectively,
and a Pattern Selector.
The Mouse and the Main
Window
When over one of the selector buttons, the left mouse button is used
to open a popup menu to select the mode, tool, color, or pattern.
The menus are so-called tear-off menus,
meaning they will "stick" to the mouse while dragging, and
can be placed anywhere on the screen.
A right mouse button click on a button opens an Attribute Window
for the corresponding selection. For users with a one-button mouse,
a right-click can consistently be emulated in Becasso by holding the
Control key while clicking. As a special shortcut, double-clicking on a
tool button also opens the corresponding attribute window.
The File Menu
The New Canvas... menu option opens a dialog window in which the
dimensions of the new canvas can be adjusted, and a new canvas can be
created. With Open File...,
you can open any image file for which you have the corresponding Translator
installed, as well as Becasso's own file format. The menu also contains
a submenu for for quick access to recently opened image files.
When the Open File... option is selected, a file panel appears showing
a thumbnail preview of any currently selected image.
You can also open files by dropping them on the main window, or by double-clicking
them in the Tracker when you have set Becasso to be the preferred
handler for their type.
With the Capture feature, you can access special add-ons for various hardware (like scanners, digital photo cameras, video cameras, or TV cards) and capture still images from them.
Print Setup opens the standard BeOS page setup dialog, which can be used to setup various properties of the printer.
About Becasso opens a window with information about the current version of Becasso and two buttons that act as shortcuts to viewing the present documentation, or Sum Software's home page, respectively.
Preferences... opens a new window in which you can select the number of recently used files to keep in the Open File... submenu, and the interface language to use next time Becasso is run. The language-specific strings used in Becasso are stored in separate files which can be edited with StyledEdit; new languages can be added without modifying Becasso itself. Furthermore, the maximum number of undo buffers can be adjusted. Note: The memory usage of Becasso is largely dependent on this setting. It is recommended you keep this number within reasonable accordance with the available RAM/virtual memory on your machine, and the average size of the images you are going to work with. It is a dynamic setting, so you do not need to restart Becasso after changing it.
Quit iterates over any open canvas windows,
checks whether their contents have been modified since the last save, asks
for an acknowledgement if so, and closes them. After that, Becasso
will exit.
The Mode Selector
 The leftmost button in the main window is for selecting the current
mode of operation of Becasso. One of the most apparent features of
Becasso is the orthogonality of the tool set, which means that any
tool can be used both for drawing and for selecting. The drawing mode
is depicted by a pencil icon, the selection mode by a pointing hand
icon. The Drawing Mode Attribute Window, which pops up on a right
click (or a Control-click) on the drawing mode icon, allows setting
the current drawing mode via a popup menu. The drawing modes in this
popup are the standard BeOS drawing modes.
The leftmost button in the main window is for selecting the current
mode of operation of Becasso. One of the most apparent features of
Becasso is the orthogonality of the tool set, which means that any
tool can be used both for drawing and for selecting. The drawing mode
is depicted by a pencil icon, the selection mode by a pointing hand
icon. The Drawing Mode Attribute Window, which pops up on a right
click (or a Control-click) on the drawing mode icon, allows setting
the current drawing mode via a popup menu. The drawing modes in this
popup are the standard BeOS drawing modes.
The Selection Mode does not have any options.
You can quickly switch between Drawing and Selection mode when a canvas window is active with the
Tab key.
The Tool Selector
The second button is used to select the current tool. For each of the
selected tools, the associated Attribute Window appears upon a right
click (or Control-click) on the button.
In order of appearance, the tools are a Brush tool, an Eraser tool, a
Fill tool, a Text tool, a Spray Can tool, a Clone tool, a Freehand tool, a Line
tool, a Free Shape tool, a Polygon tool, a Rectangle tool, an Oval
tool, a Circle tool, and an Ellipse tool.
The Brush Tool
 A Brush in Becasso is basically an 8 bit alpha map. The Brush Attribute
Window allows adjustment of the brush dimensions and angle, as well as
the strength with which it will draw.
The Spacing slider adjusts the spacing in pixels between adjacent applications of the brush
during a brush stroke. The Hardness parameter adjusts between a "fuzzy" and
a "sharp" brush.
In selection mode, you can use the brush to make
"fuzzy" selections. When the drawing mode is set to Copy or
Over, the brush is alpha blended to the background image, in all the
other modes the corresponding BeOS drawing mode is used to draw the
brush as a greyscale bitmap in the selected foreground color.
A Brush in Becasso is basically an 8 bit alpha map. The Brush Attribute
Window allows adjustment of the brush dimensions and angle, as well as
the strength with which it will draw.
The Spacing slider adjusts the spacing in pixels between adjacent applications of the brush
during a brush stroke. The Hardness parameter adjusts between a "fuzzy" and
a "sharp" brush.
In selection mode, you can use the brush to make
"fuzzy" selections. When the drawing mode is set to Copy or
Over, the brush is alpha blended to the background image, in all the
other modes the corresponding BeOS drawing mode is used to draw the
brush as a greyscale bitmap in the selected foreground color.
The Eraser Tool
 With the eraser, you can reset parts of the canvas to the background.
When erasing the background layer itself (see the section on layers,
below), the result will be that the canvas will be completely transparent
at that place. When there is no opacity, Becasso shows a light
grey / dark grey checkerboard pattern. This is not an actual part of
the canvas.
With the eraser, you can reset parts of the canvas to the background.
When erasing the background layer itself (see the section on layers,
below), the result will be that the canvas will be completely transparent
at that place. When there is no opacity, Becasso shows a light
grey / dark grey checkerboard pattern. This is not an actual part of
the canvas.
In the Eraser Attribute Window, the shape of the eraser can be
selected and its dimensions adjusted.
The Fill Tool
 With this tool, you can change the color of an area of (approximately)
the same color to the selected pattern (see the Pattern Selector
section, below). Clicking on a pixel will paint all adjacent pixels
of the same color (within an adjustable tolerance). The Fill
Attribute Window allows adjustment of this tolerance, either by
directly specifying the maximum deviance of each of the Red, Green,
and Blue channels, or by specifying the maximum visual distance of the
pixels. This visual distance takes into account the fact that the
human eye is not equally sensitive to every color, and weighs the
separate color channels accordingly.
With this tool, you can change the color of an area of (approximately)
the same color to the selected pattern (see the Pattern Selector
section, below). Clicking on a pixel will paint all adjacent pixels
of the same color (within an adjustable tolerance). The Fill
Attribute Window allows adjustment of this tolerance, either by
directly specifying the maximum deviance of each of the Red, Green,
and Blue channels, or by specifying the maximum visual distance of the
pixels. This visual distance takes into account the fact that the
human eye is not equally sensitive to every color, and weighs the
separate color channels accordingly.
In selection mode, the fill tool doubles as a "magic wand",
selecting all pixels of an area with (approximately) the same color.
The tolerance is reflected in the selection map, so that color nuances
are preserved.
The Text Tool
 When the text tool is active, you can place the text on the canvas
clicking. In the text tool's attribute window, you can click in the
text box and enter any text (including multiline texts).
The Text Attribute Window allows selection of the font family and
style, as well as adjustment of the point size, shear, and rotation.
In selection mode, you can use this tool to make a selection in the
shape of the text.
When the text tool is active, you can place the text on the canvas
clicking. In the text tool's attribute window, you can click in the
text box and enter any text (including multiline texts).
The Text Attribute Window allows selection of the font family and
style, as well as adjustment of the point size, shear, and rotation.
In selection mode, you can use this tool to make a selection in the
shape of the text.
Note that this tool operates quite differently in version 2.0 than in
earlier versions, where you would click on the canvas to get a text
box to appear on the canvas, which was harder to position your
text just right.
The Spray Can Tool
 The Spray can deposits a steady flow of random pixels onto the canvas
via a Gaussian spread function. The Spray Can Attribute Window allows
adjustment of the spread in pixel units, flow rate, and color ratio.
A color ratio of 0.0 only deposits pixels in the foreground color, a
ratio of 1.0 only background colored pixels. Any value in between
"mixes" the colors. The "Fade with Distance" checkbox
lets the pixels be lighter (less opaque) when farther away from the
cursor. Operating the spray can tool with the right mouse button (or
via the Control key) inverts this ratio.
The Spray can deposits a steady flow of random pixels onto the canvas
via a Gaussian spread function. The Spray Can Attribute Window allows
adjustment of the spread in pixel units, flow rate, and color ratio.
A color ratio of 0.0 only deposits pixels in the foreground color, a
ratio of 1.0 only background colored pixels. Any value in between
"mixes" the colors. The "Fade with Distance" checkbox
lets the pixels be lighter (less opaque) when farther away from the
cursor. Operating the spray can tool with the right mouse button (or
via the Control key) inverts this ratio.
The Clone Tool
 The Clone tool is like the brush tool (and offers the same settings)
but instead of depositing "ink", it will copy the pixels from elsewhere
on the canvas. The "source" position (where the pixels will be copied from)
remains at a fixed distance from the cursor position. This distance can be
set by right-clicking the mouse and dragging (a red line will show the displacement
vector). While drawing (using the left mouse button), the source position is shown
by a small cross cursor.
This tool can be used to retouch "spots" and "scratches" on a canvas,
by copying pixels from an area close to the damaged area.
The Clone tool is like the brush tool (and offers the same settings)
but instead of depositing "ink", it will copy the pixels from elsewhere
on the canvas. The "source" position (where the pixels will be copied from)
remains at a fixed distance from the cursor position. This distance can be
set by right-clicking the mouse and dragging (a red line will show the displacement
vector). While drawing (using the left mouse button), the source position is shown
by a small cross cursor.
This tool can be used to retouch "spots" and "scratches" on a canvas,
by copying pixels from an area close to the damaged area.
The Freehand Tool
 This tool allows freehand drawing. The Freehand Attribute Window has
only the single parameter of the pen size. The pen uses the current
pattern, or its inverse when operated with the right mouse button (or
via the Control key).
This tool allows freehand drawing. The Freehand Attribute Window has
only the single parameter of the pen size. The pen uses the current
pattern, or its inverse when operated with the right mouse button (or
via the Control key).
The Lines Tool
 There are two major paradigms on the user interface for specifying
lines on a canvas. The first ("click-drag-release") lets the
user fix the starting point of the line by clicking, and while the
user holds down the mouse button and drags the cursor, a
"rubber" line will stick to the mouse cursor, following the
movements of the user. Releasing the mouse button will fix the end
point.
There are two major paradigms on the user interface for specifying
lines on a canvas. The first ("click-drag-release") lets the
user fix the starting point of the line by clicking, and while the
user holds down the mouse button and drags the cursor, a
"rubber" line will stick to the mouse cursor, following the
movements of the user. Releasing the mouse button will fix the end
point.
The second ("click-move-click") is less common because it is
thought to break the general mouse usage paradigm as used throughout
the OS, but it allows multiple-vertex lines by having the user fix the
vertices by clicking, while a "rubber" line follows the cursor
even when the mouse button is up.
Becasso offers both paradigms and uses a simple algorithm to detect
which one the user is currently applying. When the user moves the
mouse while the button is still down, Becasso will use the
click-drag-release paradigm, ending the line when the user releases
the mouse. When the user releases the mouse on the same spot as where
the line was initiated, Becasso will switch to the click-move-click
paradigm. Whenever the user presses the left mouse button, a line
segment from the previous vertex to the current cursor position will
be painted in the current pattern, or in the inverted pattern when a
vertex is fixed with the right mouse button (or via the Control key).
The user can end adding points by activating any other window (not
necessarily a Becasso window).
The Line Attribute Window has a checkbox for determining whether
vertices should be filled to give a smooth line. This is only of
significance with larger pen sizes.
The Shape Tools
The following six tools are shape tools. Their Attribute Windows all
have two general options in common, namely the pen size and the
general shape type. This is one of: Shape filled with the current
pattern, with an outline in the current pen size and current
foreground color (or all these inverted when operated with the right
mouse button), shape filled with the current pattern, no outline, or an
outline only, painted with the current pen size and in the current
pattern.
The Free Shape Tool
 This tool allows the user to draw any shape on the canvas. This tool
only uses the click-drag-release paradigm. When the mouse button is
released, the shape is closed.
This tool allows the user to draw any shape on the canvas. This tool
only uses the click-drag-release paradigm. When the mouse button is
released, the shape is closed.
In selection mode, this tool mimics a "lasso selection
tool".
The Polygon Tool
 This tool uses the click-move-click paradigm to fix vertices of the
polygon. The last point of the polygon is designated by using the
tertiary mouse button or the right mouse button (or the Control key). More precisely, it is
designated by clicking with the other mouse button then was used to
fix the first vertex. You can cancel the operation by pressing the
This tool uses the click-move-click paradigm to fix vertices of the
polygon. The last point of the polygon is designated by using the
tertiary mouse button or the right mouse button (or the Control key). More precisely, it is
designated by clicking with the other mouse button then was used to
fix the first vertex. You can cancel the operation by pressing the Esc key.
The Rectangle Tool
 The Rectangle tool (as well as the remaining three tools) can use both
the click-drag-release and the click-move-click paradigms to fix the
diagonally opposite corners of a rectangle. In selection mode, this
tool is equivalent to the normal selection tool of conventional
graphic software without Becassos orthogonality.
The Rectangle tool (as well as the remaining three tools) can use both
the click-drag-release and the click-move-click paradigms to fix the
diagonally opposite corners of a rectangle. In selection mode, this
tool is equivalent to the normal selection tool of conventional
graphic software without Becassos orthogonality.
The Oval Tool
 In this context, an oval is a rectangle with rounded corners. The
radii of the corners can be set in the Oval Attribute Window, offering
the option of either fixed radii (the "Absolute Corners" radio
button; the number of pixels in x- and y-directions can be adjusted
with the corresponding sliders in the "Absolute" tab view) or
variable radii (the "Relative Corners" radio button; the ratio
of the radii to the total dimensions of the oval can be adjusted with
the corresponding sliders in the "Relative" tab view).
In this context, an oval is a rectangle with rounded corners. The
radii of the corners can be set in the Oval Attribute Window, offering
the option of either fixed radii (the "Absolute Corners" radio
button; the number of pixels in x- and y-directions can be adjusted
with the corresponding sliders in the "Absolute" tab view) or
variable radii (the "Relative Corners" radio button; the ratio
of the radii to the total dimensions of the oval can be adjusted with
the corresponding sliders in the "Relative" tab view).
The Circle Tool
 Circles can be painted on the canvas by either fixing the center of
the circle and moving the mouse outward to adjust the radius (again,
by either of the two paradigms) or by fixing a point on the perimeter
and having the center of the circle coincide with the mouse cursor.
Which of these methods is to be used can be selected from the Circles
Attribute Window.
Circles can be painted on the canvas by either fixing the center of
the circle and moving the mouse outward to adjust the radius (again,
by either of the two paradigms) or by fixing a point on the perimeter
and having the center of the circle coincide with the mouse cursor.
Which of these methods is to be used can be selected from the Circles
Attribute Window.
The Ellipse Tool
 Either of the paradigms can be used to define the diagonally opposite
corners of a rectangle circumscribing the ellipse, i.e. defining a square
yields a circle.
Either of the paradigms can be used to define the diagonally opposite
corners of a rectangle circumscribing the ellipse, i.e. defining a square
yields a circle.
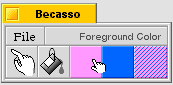
The Color Selectors
The third and fourth button on the Becasso main window are used to
select the current foreground and background colors, respectively.
When a color selector is pressed with the left mouse button, a palette
pops up, containing 256 color entries. Although the palette defaults
to the BeOS system palette, it is not limited to this and can in fact
contain any choice of colors. The foreground and background color
selectors maintain separate palettes.
Clicking on a color selector with the right mouse button (or with the
Control modifier key held down) will pop up an extensive Color Editor window.
Note that in the current version, the palette popups are not dithered
on 8 bit screens. With the default palette this is not noticeable
since the colors exactly match the 256 available colors in 8 bit
screens, but when a palette contains altered colors, this might not be
apparent from the popup. The color selectors themselves are dithered
on 8 bit screens.
The Pattern Selector
The rightmost selector on the main window is for selection of the
current pattern.
For most tools, operating them with the left mouse button will paint
in the current pattern, and operating them with the right mouse button
(or with the Control key) in the inverse of that pattern (i.e. with
the foreground and background colors switched). The top right
pattern is a solid low color, which is especially convenient in
combination with outlined, filled shape tools to draw shapes with a
solid background color and an outline in the foreground color.
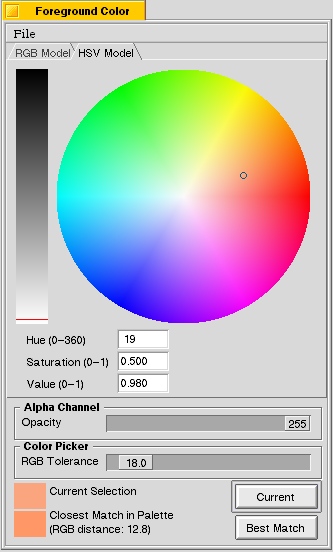
The Color Editor
The Attribute Window of the color selectors contains an extensive
color editor, featuring both RGB and HSV models. On 8 bit screens,
the color areas are dithered to most accurately represent the color
shades.
 The File Menu
Palettes can be saved and loaded. The Becasso palette file format is
human readable. You can also load palettes by dropping them on the
appropriate color selector button. or on the corresponding color
editor window.
Furthermore, Becasso can generate several built-in palettes.
RGB Model
In this model, the user can select which of the three color components
Red, Green, or Blue should be placed in the color column on the left
of the tab view, by selecting the corresponding radio button. The
other two colors will span the 2D area to the right. Clicking (or
dragging) the mouse inside either of these two color areas will ajdust
the corresponding color values. You can also set the color components
directly by entering a value between 0 (no color) and 255 (full
intensity) into the corresponding text control.
HSV Model
The Hue, Saturation, Value model for color selection uses a color
wheel on the right, in which the hue (0 - 360, as angle from the
horizontal) and the saturation (0 - 1, the distance from the center of
the wheel) can be selected, as well as an intensity selector on the
left, with which the Vaule (0 - 1) can be set. You can also set the
components directly by entering the correct value in the corresponding
text control.
Alpha Channel
The alpha channel determines the opacity of a color. With the slider,
the alpha value can be adjusted from 0 (fully transparent) to 255
(fully opaque). The setting of this slider determines the alpha value
of all subsequent color selections; you need not set the alpha value
for each of the colors in the palette.
Color Selection
At the bottom part of the color editor, two color patches are visible.
The first shows the current color selection, the second the closest
match in the current palette, along with the visual distance between
them. Pressing the "Current" button on the right (or pressing
Enter) will replace the currently selected color in the color selector
with the currently selected color in the color editor. You can achieve the
same effect by clicking the right mouse button twice on the same color.
The "Best Match" button tries to locate the closest match in the
current
palette within a certain tolerance, and replaces that if it is found,
or the currently selected color if not. This also happens when double-clicking
with the left mouse button.
The tolorance is expressed in
actual visual distance (see the explanation under the Fill Tool,
above), and can be adjusted with the "Color Picker" slider in
the color editor. This tolerance is also used when picking colors
from the canvas (see Color Picking, below).
Color Drops
Becasso is fully compatible with röDesigns röColour
drops. You can use röColour to generate the correct color and
drop this on either of the Color Selector buttons in the
Becasso Main Window, or anywhere on the Color Editor
Window.
Apart from receiving these color drops, Becasso also
generates them. You can initiate a color drop by clicking on
either of the color patches in the lower left corner of the Color
Editor window, and dragging to the desired location (for example, a StyledEdit
or Pe window (in which case the color information will be inserted in hexadecimal
format, as understood by HTML), the Desktop background, or a Becasso canvas).
The Canvas Window
Opening an existing image on disk or a new canvas will open a Canvas
Window. The title will show the file name (or "Untitled
n" in the case of a new canvas) and the current scale
factor in percentage. The contents of the canvas are dithered on 8
bit screens to most closely match the actual colors. Note that this
happens in real time as you draw, and dragging the canvas window from
one workspace to another with a different bit depth will cause the
dithering to automatically be adjusted.
Left of the bottom scroll bar, the current mouse coordinates are shown.
Selections
Selections are shown by inverting the selected pixels whenever the
mouse is in the canvas view. Selections can be of any shape, and you
can use any tool in selection mode to add areas to the selection.
Furthermore, a selection is actually an alpha map, allowing for
"fuzzy" selections as made with the brush tool. You can copy
and paste selections between different windows of Becasso. You can
also initiate a drag-and-drop sequence by holding the Shift key while
clicking on the canvas in selection mode. Clicking the left mouse
button will copy the selection into the buffer, while the right mouse
button (or a Shift-Control-click) will also cut it from the canvas.
You can drag the selection around, during which it will be alpha
blended in real time, and drop it by releasing the mouse button.
Becasso uses the extended Drag'n'Drop protocol Be introduced in R4; you can drag image clips from ShowImage to Becasso. Currently not the other way around, but that is a ShowImage bug. You can also save clips by dragging them onto the Desktop.
Note that you can quicky change between drawing and selection mode by
use of the TAB key shortcut.
Picking Colors
During the operation of any tool, holding the Option key while
clicking somewhere on the canvas activates a Color Picker tool.
The cursor will change to an "eye dropper" icon to reflect this.
Clicking the left mouse button picks the foreground color, clicking
the right mouse button (or Control-Option-clicking) will select the
background color. The color picker tool will look for the closest
match in the current palette of the selected color (foreground or
background) and replace that with the color under the mouse cursor if
it is within the tolerance (which can be adjusted in the corresponding
color editor window), or replace the currently selected color if it is
not.
The File Menu
The File Menu offers a superset of the File menu
in the Becasso main window. Opening a file from this menu will open a
new canvas window with the contents of that file.
Save and
Save As... will save the current canvas image in Becassos
own format, storing information about layers and settings as well.
Becasso also permits exporting the image to other formats via the
Translation Kit. Selecting Export... from the menu will open a window
with all the formats for which you have Translators installed on
your system, from which you can pick which format to use. Some formats
offer various settings; these can be adjusted in the bottom part of
the window. When you click the "Use" button, a File Panel
will pop up, allowing you to select a file name as usual; Becasso will
suggest a proper file name extension for you if you have these filled in in your
BeOS MIME database, and offer to fill it in if you haven't.
Becasso comes bundled with eight Translators: A
GIF, JPEG, PNG, EPS, BMP, TIFF, Photoshop, and a Becasso native Transator so
you can open Becasso images in other applications using the Translation Kit directly.
NOTE: Exporting your canvas to any of these file formats
will potentially lose important information
about your canvas, most notably the layering information. This includes exporting
as a Photoshop file, and even in Becassos own format. This is because images
are always "flattened" before saving. This may change in a future version,
as soon as we implement layer-preserving Photoshop translation. Also note that some
file formats support only a limited number of colors, in which case you will achieve
vastly better results when you "quantize" your image first. See
Quantizing for more information.
Close first checks whether the contents of the window were saved.
If not, you warned and given the choice to cancel the closing,
save the file, or discard any changes and abandon the file. After this,
the window is closed. The same can be effected by clicking on the closer
gadget in the window title.
Quit performs the same actions as Close on all windows of
Becasso. The same can be effected by selecting Quit from
the main window, or pressing its closer gadget.
The Edit Menu
Becasso offers multiple undo/redo, which are accessible from
the Edit menu. The maximum number of undo buffers can be selected
from the Drawing Mode Attribute Window.
The Edit menu also offers the usual range of cut, copy and
paste operations. When a selection is drawn, the relevant menu options
are active. You can copy a selection directly to a new layer or even a new
canvas (which is automatically generated with the correct dimensions). This
is a new feature in version 1.5.
Select All makes a selection of the entire canvas,
Deselect All clears the selection map. Invert Selection
switches the selection map to its inverse. The Select by Color
submenu allows for quickly making a selection map according to a given
color. The Automatic option tries to guess what the background
color of the present image is, and selects according to it. This can
be a valuable shortcut to select an image on a more-or-less
flat-colored background.
Colorize Selection colors the canvas according to the selection
map.
With Extract Palette, you can make Becasso scan the current
layer and perform a color quantization algorithm
to find the palette that best matches
the image. This is especially useful when reducing the color count later on
(for example, before exporting to GIF which can contain 256 colors at most).
The Channel to Selection menu items will copy the given color
channel into the selection map, and Selection to Channel will
replace the given color channel with the current selection.
More about selections and the various ways of generating and using them,
below.
The Entire Canvas submenu offers a number of operations that can
be performed on the canvas as a whole. Crop to Window is active
(selectable) when the window is smaller than the canvas, and cuts off
any parts not visible. Crop to Selection is active whenever
there is a selection, and crops the canvas to the minimal rectangle
circumscribing the selection. Autocrop crops the canvas to
the smallest rectangle containing the picture.
When the window is larger than the canvas, you can pad the canvas to the
window size. This "adds canvas" to the original canvas, thus
enlarging it, without altering the original contents.
Resize to Window accomplishes the same by streching or shrinking
of the original canvas, offering the choice to keep the same ratio
between width and height as in the original (thus, probably, not filling
the entire window), or filling the entire window with the canvas, thus
altering the aspect ratio when needed.
Resize To... opens a new window in which you can enter new dimensions
to resize the image to.
Rotate offers the possibility to rotate the entire canvas in 90
degrees steps.
Note: In the current version of Becasso, you
cannot undo operations that change the size of the canvas.
The Filter, Transform, and Generate submenus offer access to add-on modules.
The last option, Center Mouse, puts the mouse either to the center of the canvas
or to the starting point of the lastly drawn shape, if applicable (which, for instance,
is useful for drawing concentric circles).
Add-Ons
Becasso does not have any filters built in, but instead uses the
advanced add-on capabilities of the BeOS to load separate modules at startup. These are
looked for in the add-ons/ directory.
Becasso discriminates three kinds of add-ons: Filters,
Transformers, and Generators.
Becasso tries to extend the orthogonality principle to the
add-ons as well, in that add-ons take the current mode (either drawing
mode or selection mode) into account wherever this makes sense. In
drawing mode, a given add-on operates on the selected part of the
canvas (or on the entire canvas if there is no selection). In
selection mode, the add-on operates on the selection map itself.
This might seem strange at first (and cumbersome to have to switch
back to drawing mode after making a selection to apply the add-on to
the selected part of the canvas) but it allows for some extraordinary
effects. For instance, generating a selection map with a gradient in
it and subsequently copy/pasting it makes blending of a selection with
the background very easy.
Most add-ons have their own window, even if they don't have any settings. These windows show a progress bar, a "Stop" button, an "Info" button, and an "Apply" button. The progress bar in the add-on window is updated as the calculation proceeds. Lengthy calculations can be interrupted by clicking the "Stop" button. The canvas will then be left unmodified.
Some add-ons can be operated interactively by "direct manipulation" of the canvas (like the Gradient Generator), others "block" while they are active (like the Tile Generator). A blocking add-on provides feedback in the form of a modified cursor.
Note to add-on developers: see the separate API documentation.
Quantizing
We will briefly expand on the Quantization add-on. The Translators
included with Becasso do not do color quantization themselves, so
if you are exporting a colorful image to a format with a limited number of
colors, you are likely to get unsatisfactory results.
Becasso, however, offers a very good color quantization system to
help overcome this limitation of these file formats. The Quantize add-on will
replace colors in the image with their best match in the palette (or any
subset of the palette, if the file format supports even less than 256 colors).
You could, for example, load the "web safe" palette included with
Becasso (the web safe palette is a palette of 216 colors
guaranteed to be displayed correctly by web browsers). To do this, simply
load it in the color editor, open the Quantize add-on, set the number of colors
to 216, and click Apply. Note that you can achieve vastly better looking
results with the Dithering option switched on.
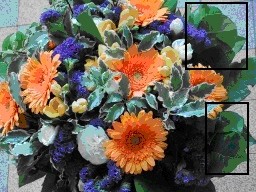
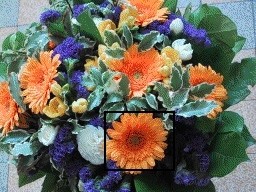
If you have control over the palette, you can have Becasso examine the
canvas and extract a set of colors best matching the image, using the
Extract Palette option in the Edit menu. With this feature,
together with the Quantize add-on, you can achieve high-fidelity renditions
of your images even with a limited number of colors. A number of example images
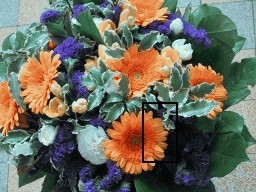
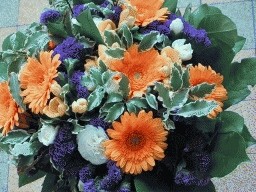
will show the dramatic differences. The areas of special interest are marked
with rectangles.

 |
 |
| Exported in 256 colors - no preparation | Quantized using dithering, 256 colors, standard palette |
 |
 |
| Quantized without dithering, 256 colors, extracted palette |
Quantized with dithering, 256 colors, extracted palette |
 |
 |
| Quantized to 128 colors, dithering | Quantized to 128 colors, dithering, extracted palette. |
ALT (or Command) modifier
to inspect the effect of the current settings on any part of the
canvas. It also reflects any changes you make to the parameters of the
filter immediately. When the effect is as desired, you can apply the
filter to the entire canvas (or its selected part if available) by
clicking the "Apply" button in the add-on window.
Transformers
A transformer add-on modifies the canvas in a different kind:
it does not necessarily operate on pixels locally, and can "distort" the
overall topology of the image.
Examples of transformers are add-ons that scale a selected part
of the canvas, rotate it, project it on a sphere, skew it, flip it,
etc. Some of these (simple) transformations (like flipping) are not
interactive (nor would that make any sense) but others can be operated
in real time by dragging the mouse over the canvas.
Since many transformations involve complex calculations, these may offer a lower-quality "preview" mode while dragging (to keep the process responsive). When the transformation is as desired, releasing the mouse (and clicking "Apply") will render the transformation on the canvas in high quality.
Generators
This class of add-ons generates an image. It may use the
current contents of the canvas and generate a new image as a function
of it (e.g. to generate a selection of all pixels with an intensity
above a given threshold, or all pixels of a given color) but it does
not need to.
 The image at the side, for instance, shows the
Gradient Generator in action. First, a selection in the form
of a text was generated (simply by typing the text in selection mode),
after which Becasso was switched back to drawing mode. Then,
the Gradient Generator add-on was opened by selecting it from the
Edit menu. The Gradient Generator generates a color gradient
from the currently selected high color to the low color, offering a
variety of types of gradient (linear/circular, with different shapes
of the gradient "ramp") and is operated by dragging
the mouse. The white line visible in the canvas
shows the current direction of the gradient, which is updated in
real time as you drag. Note that only the selected part of the canvas
(i.e. the text) is affected. When the gradient is as desired, releasing
the mouse will render it (without the guide line of course) on the
canvas.
The image at the side, for instance, shows the
Gradient Generator in action. First, a selection in the form
of a text was generated (simply by typing the text in selection mode),
after which Becasso was switched back to drawing mode. Then,
the Gradient Generator add-on was opened by selecting it from the
Edit menu. The Gradient Generator generates a color gradient
from the currently selected high color to the low color, offering a
variety of types of gradient (linear/circular, with different shapes
of the gradient "ramp") and is operated by dragging
the mouse. The white line visible in the canvas
shows the current direction of the gradient, which is updated in
real time as you drag. Note that only the selected part of the canvas
(i.e. the text) is affected. When the gradient is as desired, releasing
the mouse will render it (without the guide line of course) on the
canvas.
Note that the add-on "remembers" the position
of this guide line, so that you can generate a gradient with the same
characteristics, even on a new canvas and with different colors, by
clicking the "Apply" button on the Gradient Generator add-on
window.
The Window Menu
From the bottom up, the Window menu offers an item to resize the
window to fit the canvas (or fill the entire screen, whichever is
smallest), and a submenu to set the current magnification of the
canvas. There are shortcuts for zooming in and out.
Every tool will work in any magnification.
The Magnify item opens a new window (new feature in Becasso 1.5)
in which you can "blow up" an area of your canvas for pixel-perfect
editing. You can select a magnification factor of 2, 4, 8, or 16,
and select between a black or white grid, or no grid at all. Note that the
color dropper also works in the magnify window, making this mode very suited
for pixel-precise retouching.
The Layers menu item opens the Layer Manager for the current
canvas.
The Layer Menu
The layer menu offers shortcuts to some of the functionality of the
Layer Manager, so you don't have to keep that open while working, and
you can switch between layers with a simple keypress. You can also
move (translate), rotate, and flip the current layer.
Layers
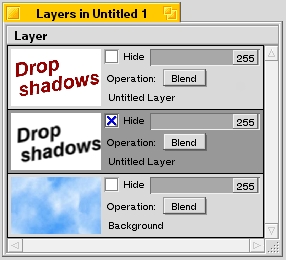 Becasso uses the concept of layers in a canvas. A layer
can best be thought of as a transparent sheet onto which you draw.
The opacity/transparency of the current colors can be adjusted with the
alpha channel slider in the color editor window. When there are only
transparent pixels in a certain region of the canvas (for example when
you use the eraser on the background layer), Becasso will show these as a
light grey/dark grey checkerboard pattern. This pattern is not part of
the actual image, and will not be included in the image when exporting.
The first layer in a new canvas is somewhat special as
it is pre-filled with a white background color. New layers will be fully
transparent upon creation. The Layer Manager shows the current layer
layout of the canvas. The layers are depicted with a thumbnail image
(which is updated in real time as you draw) and can be given a name by
double-clicking on it. The currently active layer (which is modified
when you draw) is shown in a darker grey. You can add new layers
on top, insert new layers above the current layer, duplicate layers
(i.e. insert a copy of the current layer) or remove layers. You can
select which layers to view by use of the "Hide" checkboxes in each
layer. Layers can be re-arranged by dragging them to their new position.
Note that imported images from different formats often have their alpha
channel set to completely opaque, which means that any layer under such
an image will be hidden by it. You can modify the "global"
alpha level of an entire layer with the slider. With the
"Operation" popup menu you can select the way layers should
be merged on top of each other. Becasso 1.5 offers Blend
and Multiply. Blend mode simply superimposes the present layer
onto all layers beneath it, whereas in Multiply mode, each color
channel of each pixel is multiplied with the result so far. This mode
can be used to "filter" certain colors. For example, putting
an all-red layer in multiply mode on top of an image filters out only
the red components.
Becasso uses the concept of layers in a canvas. A layer
can best be thought of as a transparent sheet onto which you draw.
The opacity/transparency of the current colors can be adjusted with the
alpha channel slider in the color editor window. When there are only
transparent pixels in a certain region of the canvas (for example when
you use the eraser on the background layer), Becasso will show these as a
light grey/dark grey checkerboard pattern. This pattern is not part of
the actual image, and will not be included in the image when exporting.
The first layer in a new canvas is somewhat special as
it is pre-filled with a white background color. New layers will be fully
transparent upon creation. The Layer Manager shows the current layer
layout of the canvas. The layers are depicted with a thumbnail image
(which is updated in real time as you draw) and can be given a name by
double-clicking on it. The currently active layer (which is modified
when you draw) is shown in a darker grey. You can add new layers
on top, insert new layers above the current layer, duplicate layers
(i.e. insert a copy of the current layer) or remove layers. You can
select which layers to view by use of the "Hide" checkboxes in each
layer. Layers can be re-arranged by dragging them to their new position.
Note that imported images from different formats often have their alpha
channel set to completely opaque, which means that any layer under such
an image will be hidden by it. You can modify the "global"
alpha level of an entire layer with the slider. With the
"Operation" popup menu you can select the way layers should
be merged on top of each other. Becasso 1.5 offers Blend
and Multiply. Blend mode simply superimposes the present layer
onto all layers beneath it, whereas in Multiply mode, each color
channel of each pixel is multiplied with the result so far. This mode
can be used to "filter" certain colors. For example, putting
an all-red layer in multiply mode on top of an image filters out only
the red components.
When exporting a picture, the current settings of the Layer Window are taken into account, i.e. layers which have been hidden by selecting their "Hide" buttons will also not be visible in the exported picture.
Modifier Overview
Since Becasso uses so many different key modifier combinations, below
is a short summary.
Control |
Consistently emulates the right mouse button |
Command |
Add-on operating; moving the filter preview area. |
Shift |
Copy (left mouse button)/Cut (right mouse button)/Paste |
Option |
Color Picker (left = foreground color, right = background color) |
--help switch for brief usage information.The PNG Translator uses libpng-1.2.4 by the PNG Development Group, which is included as a shared library.
The JPEG Translator is based in part on the work of the Independent JPEG Group and uses jpeg-6b (included as libjpeg.so.62.0.0).
Note: The BeOS itself comes with PNG and JPEG translators, but these offer less adjustable
parameters. When you move the bundled PNG and JPEG translators out of the
~/config/add-ons/Translators directory (for example into a directory
~/config/add-ons/Translators/Hide), the system will default back to the
BeOS-supplied translators.
The TIFF Translator uses libtiff-3.5.6. BeOS comes with a TIFF Translator,
but that one is read-only. Note that TIFF is quite a comprehensive file format,
and offers various types of compression. Not all TIFF readers on
other platforms can handle all these compression types, so some experimentation
is required to find the best settings for your particular use.
The following table lists some compatibility data for (older) Windows programs. Thanks
to Joachim Seemer for providing these data. If you can provide more up-to-date information
on compatibility from the TIFF Translator, we would love to hear from you.
| Compression | None | PackBits | JPEG | Deflate |
| Metacreation Painter | + | – | – | – |
| Photoshop 4.0 | + | + | – | – |
| Freehand 7.0 | + | – | – | – |
| Windows 98 system (Imaging) | – | – | – | – |
The GIF Translator is also based in part on the work of the Independent JPEG Group, but does not
use the libjpeg.so shared library. The Graphics Interchange Format© is the Copyright
property of CompuServe Incorporated. GIFsm is a Service Mark property of
CompuServe Incorporated. Note that to avoid entanglements with Unisys' patent on LZW
compression, the Translator only outputs "uncompressed GIF" files, and its
use is not recommended. It does fully support the GIF89a Transparency extension and the
resulting GIF files are compatible with any GIF reader, but they can be large in size.
For more information on GIF compression see GIF.html.
The Becasso Translator is provided so Becasso native files can be directly used in any other BeOS application using the Translation Kit. Note that it is not recommended to export images in this format from Becasso itself (rather then using the normal Save option) because the file will be flattened first and lose any layer information (just like exporting to any other format). The Becasso Translator links against the zlib compression library by Jean-loup Gailly and Mark Adler, just as the Becasso executable itself does. Zlib is provided as a shared library libz.so.1.1.4.
The EPS Translator offers output of EPS bitmaps. It is special in that it detects whether
Ghostscript is installed on your system (and you have libgs.so in your ~/config/lib
directory). In this case, the translator enables you to read PS graphics into Becasso (and any
other application using the Translation Kit) as well (!). A BeOS port of Ghostscript
is available here.
Any modifications made to the library sources themselves for porting to the BeOS (i.e. except some of the configuration scripts to get them to build) were folded back into the respective original source trees and can hence be reproduced by getting the most recent versions of the sources.
The Photoshop (PSD) Translator reads and writes Photoshop files, but
currently does not preserve layers yet. It will read (and write) the flattened
image present in every PSD file, and only if that is in RGB format (which the
majority is). Major work is planned on the PSD translator so a future version
of Becasso is planned to support reading and writing PSD files while keeping
layering information.
Credits
During the development of Becasso, the following people (in no particular
order) were of invaluable help:
Sum Software, February 2003
The author can be reached at becasso@sumware.demon.nl.